15 Mar 2022

Sunflower Birthday Card take 5


A birthday card for my wonderful sister. 

I stamped the image from Hero Arts mymonthlyhero September 2021 in caramel ink and left the stamp in my stamp positioner so I could gold heat embossed the image after I coloured it.

Using the layering stencils from the kit, I coloured the image using blending brushes and the ink from the kit. Colours are butter bar, caramel, root beer and key lime fizz. When the ink was completely dry, I re stamped the image with embossing ink and gold heat embossed it.

The panel is 6inches by 4 inches. I positioned the image on this and cut off the overhang.

I lightly ink blended butter bar ink around the edges of the panel. I decided where flowers would go and then stamped the sentiment using root beer ink a couple of times. The image is stacked on 2 layers of cardstock for dimension.  The piece that was cut off is adhered directly to the panel. The panel is matted on gold cardstock and adhered to a 5inch by 7 inch card base.

"Happy birthday" is from Memory Box and "sister" is Avery Elle. I love how they fit together despite being from different companies.

Thanks for stopping by,
Helen xo


16 Oct 2021

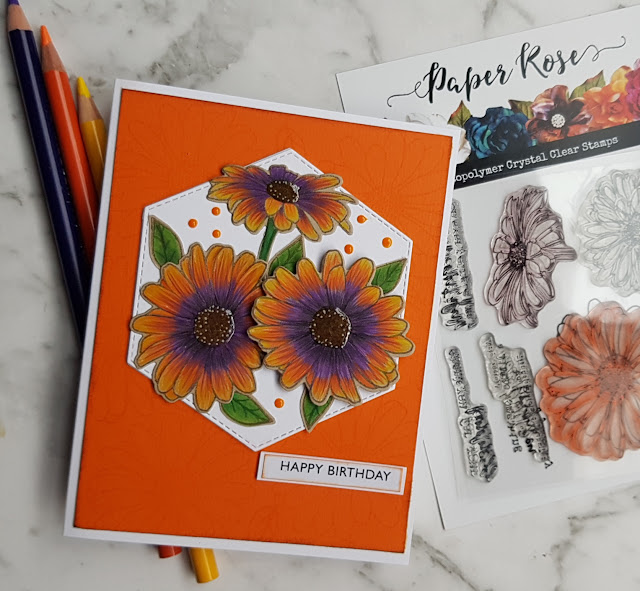
Sunset Daisy Birthday Card

 For this birthday card,  I used the beautiful daisy days stamp set from Paper Rose Studio. I tried to recreate the osteospermum I recently bought. 

I'm entering this card in the flower challenge "use a shape". I've used a hexagon.

The flowers were stamped onto neenah desert storm cardstock using brown ink. I then used prismacolor pencils to colour the images. I started with violet at the base of the petals and then moved to orange and then yellow, all with a flicking motion. I then added black to the very base of the petal to darken the purple.  I then repeated all the colours. The flower centres, I coloured brown making it darker around the edge. I then added dots using a white gel pen.

I then struggled with the background,  trying different colours until I settled on orange.

On the orange cardstock I stamped the flower and leaves in versamark ink for a watermark effect. This panel was cut slightly smaller than my cardbase and the edges were inked with vintage photo distress ink.

The hexagon is 3 layers of cardstock for a little dimension.

The sentiment is from Paper Rose Studio sentiments.  I cut it to size and inked around the edge with orange ink and then adhered it to white cardstock slightly bigger. 

The leaves and 2 flowers are adhered directly to the hexagon and the third flower is on foam tape.

I finished with glossy accents on the flower centres and orange nuvo drops.


Thanks for stopping by,
Helen xo


29 Sept 2021

Balloon Background Birthday Card

 Using Paper Rose Studio Balloons 3D embossing folder, I embossed a panel of watercolour paper. Then, using mini distress ink cubes in rainbow order I swiped across the embossed panel. I then sprayed the panel with water so the inks would move. Colours used were picked raspberry, mustard seed, twisted citron, salty ocean and wilted violet.


I trimmed the panel when it had dried and matted it on pink cardstock. This was then adhered to a white card base leaving a thin white border.

Sentiment is Paper Rose Studio large happy birthday die.

I finished with some star sequins, also in rainbow colours. 

Thanks for stopping by,
Helen xo


27 Sept 2021

Hero Arts My Monthly Hero September 2021


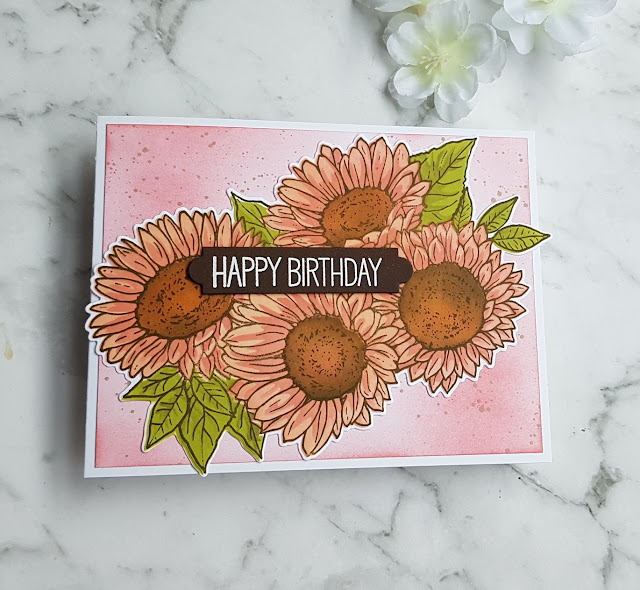
Using the beautiful sunflower stamp from the kit, I made the same card three times using different colours. I started by stamping the image in the root beer ink included in the kit, on three pieces of white cardstock. I used a stamp positioner and didn't worry if the image wasn't perfect because I knew I'd be re stamping after using the stencils. I found it easier to use the stencils if I had the image first.

The stamp was left in my stamp positioner while I coloured the images. I then re stamped using root beer again, more than once if needed. Images were then die cut.

The backgrounds were ink blended around the edges with one of the colours used on the flowers and then spattered with root beer reactive ink. Sentiments are white heat embossed onto dark brown cardstock. The die cut image slightly overhangs the cardbase but the finished cards still fit in an envelope so I didn't trim them.


Flowers: LDRS Peachy Keen first. Hero Arts Fresh Peach detail layer.
Centres: Hero Arts Caramel and then root beer only around the edge. I did not use the detail centre layer for this card.
Leaves: Hero Arts root beer for detail layer and then Momento pear tart over top for main layer.
Background is Hero Arts fresh peach ink blend and root bear spatters.


Flowers: Hero Arts bubble gum first and then Momento lilac posies detail layer.
Centres: Hero Arts caramel and root bear around edges. Also root beer very lightly for detail layer.
Leaves: Hero Arts key lime fizz for main layer and Simon Says Stamp key lime for detail layer.
Background: Hero Arts bubble gum ink blend around edges and root beer spatters.


Flowers: Simon  Says Stamp lemon zest first and then Hero Arts Butter Bar for detail.
Centres: Hero Arts Caramel with Root Beer around the edge. No detail layer.
Leaves: Hero Arts Root Beer for detail layer with key lime fizz over top for main layer.
Background: Hero Arts key lime fizz ink blended around edges and root beer and key lime fizz spatters.

Thanks for stopping by,
Helen xo


26 Sept 2021

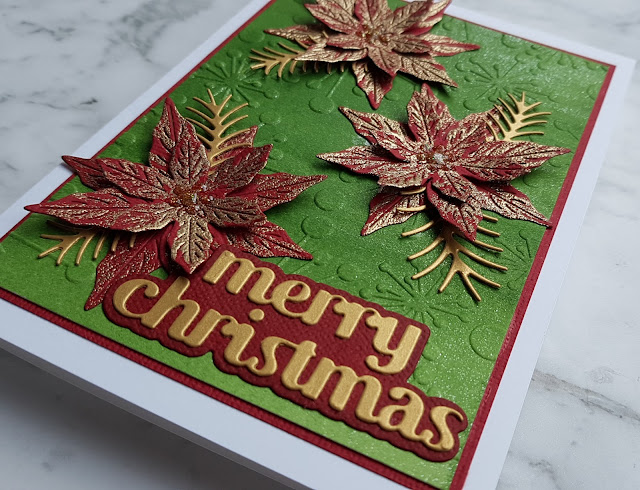
Poinsettia Christmas Card

 I was inspired by the wonderful Nichol Spohr for this card. The finished card is 4.5inches by 6.5 inches.

Using Hero Arts paper layering poinsettia die set, I cut 6 of the medium petals and 3 of the smallest from dark red cardstock. I only wanted small flowers so didn't use the largest die. 

I applied versamark ink using a versamarker pen to the tips of the larger petals and all over the smaller die cut. I did not bother with anti static powder because I wanted a distressed look. I then coated them with gold embossing powder and heated. They all looked different and I love how they look when assembled.

Each flower is 2 larger die cuts adhered in the centre and offset. The third layer was then adhered to the top.

The background is Hero Arts liquid watercolour in the colours of pine and moss. I kept layering the colour until I was happy with it and then painted Hero Arts iridescent water colour ink over top for sparkle.

When the background was completely dry, I embossed it with a starburst embossing folder because I thought it fit the Christmas theme.

The leaves are from Paper Rose studio as is the Merry Christmas. 

I adhered the poinsettias only by the bottom layer so the other layers can fold up slightly for dimension. 

I matted the green panel on red and adhered it to a cardbase.

I finished with gold glitter nuvo drops on the flower centres. They don't stand out as much as I would like but it is what it is. 


Thanks for stopping by, 
Helen xo


21 Sept 2021

Fairy Birthday Wishes


I made this birthday card for my beautiful daughter. The finished card is 5 inches by 7 inches.

For the panel, I ink blended squeezed lemonade distress oxide ink around the edges leaving the centre clear. I then blended picked raspberry distress oxide over top of that but not going as far as the yellow. This gave me a beautiful coral colour round the edge with a yellow centre.

When completely dry, I stamped the the flowers and butterflies and heat embossed with Hero Arts white satin pearl embossing powder. The sentiment is gold heat embossed.

I then spattered perfect pearls and water over the whole background for sparkle.


The fairy and flower are from my monthly hero December 18 and are stamped onto distress watercolour paper. The fairy is black heat embossed and the flower is gold heat embossed. They were then coloured using distress inks in the same colours as the background. I then added a little colour pencil for added depth.

The fairy and flower were then die cut and attached with foam tape.
Nuvo glitter pen on the fairy and flower and gelly roll sparkle pen on the wand and dropping down onto the sentiment.
Inside the card, more butterflies are stamped in pale yellow and pink and the sentiment is Paper Rose Studio large happy birthday in gold shimmer paper.
There is glossy accents on the flower centre into which I dropped some clear micro beads from Paper Rose Studio.


Thanks for stopping by,
Helen xo


15 Jun 2021

Balloon Shaker Birthday Card

 Another card using Paper Rose Studio nesting balloon dies.

I cut the panel and balloon together and then stamped the sentiment.

A piece of acetate was adhered to the back, followed by one layer of foam tape around the balloon. I then added some Paper Rose Studio rainbow shaker mix and some tiny beads for added noise. Another layer of acetate was adhered to the foam tape to contain the shaker mix. 

Foam tape was then added to the entire back of the panel.

A piece of silver glitter paper was adhered to the cardbase where the balloon would be positioned. The shaker panel was then adhered to the cardbase. 

I adhered more balloons and added  highlights with a white gel pen. I finished with star sequins and some of the shaker mix in rainbow colours. 


Thanks for stopping by, 
Helen xo


.


Featured Post

Pink Thank you Card