Showing posts with label hero arts. Show all posts

27 Sept 2021

Hero Arts My Monthly Hero September 2021


Using the beautiful sunflower stamp from the kit, I made the same card three times using different colours. I started by stamping the image in the root beer ink included in the kit, on three pieces of white cardstock. I used a stamp positioner and didn't worry if the image wasn't perfect because I knew I'd be re stamping after using the stencils. I found it easier to use the stencils if I had the image first.

The stamp was left in my stamp positioner while I coloured the images. I then re stamped using root beer again, more than once if needed. Images were then die cut.

The backgrounds were ink blended around the edges with one of the colours used on the flowers and then spattered with root beer reactive ink. Sentiments are white heat embossed onto dark brown cardstock. The die cut image slightly overhangs the cardbase but the finished cards still fit in an envelope so I didn't trim them.


Flowers: LDRS Peachy Keen first. Hero Arts Fresh Peach detail layer.
Centres: Hero Arts Caramel and then root beer only around the edge. I did not use the detail centre layer for this card.
Leaves: Hero Arts root beer for detail layer and then Momento pear tart over top for main layer.
Background is Hero Arts fresh peach ink blend and root bear spatters.


Flowers: Hero Arts bubble gum first and then Momento lilac posies detail layer.
Centres: Hero Arts caramel and root bear around edges. Also root beer very lightly for detail layer.
Leaves: Hero Arts key lime fizz for main layer and Simon Says Stamp key lime for detail layer.
Background: Hero Arts bubble gum ink blend around edges and root beer spatters.


Flowers: Simon  Says Stamp lemon zest first and then Hero Arts Butter Bar for detail.
Centres: Hero Arts Caramel with Root Beer around the edge. No detail layer.
Leaves: Hero Arts Root Beer for detail layer with key lime fizz over top for main layer.
Background: Hero Arts key lime fizz ink blended around edges and root beer and key lime fizz spatters.

Thanks for stopping by,
Helen xo


26 Sept 2021

Poinsettia Christmas Card

 I was inspired by the wonderful Nichol Spohr for this card. The finished card is 4.5inches by 6.5 inches.

Using Hero Arts paper layering poinsettia die set, I cut 6 of the medium petals and 3 of the smallest from dark red cardstock. I only wanted small flowers so didn't use the largest die. 

I applied versamark ink using a versamarker pen to the tips of the larger petals and all over the smaller die cut. I did not bother with anti static powder because I wanted a distressed look. I then coated them with gold embossing powder and heated. They all looked different and I love how they look when assembled.

Each flower is 2 larger die cuts adhered in the centre and offset. The third layer was then adhered to the top.

The background is Hero Arts liquid watercolour in the colours of pine and moss. I kept layering the colour until I was happy with it and then painted Hero Arts iridescent water colour ink over top for sparkle.

When the background was completely dry, I embossed it with a starburst embossing folder because I thought it fit the Christmas theme.

The leaves are from Paper Rose studio as is the Merry Christmas. 

I adhered the poinsettias only by the bottom layer so the other layers can fold up slightly for dimension. 

I matted the green panel on red and adhered it to a cardbase.

I finished with gold glitter nuvo drops on the flower centres. They don't stand out as much as I would like but it is what it is. 


Thanks for stopping by, 
Helen xo


21 Sept 2021

Fairy Birthday Wishes


I made this birthday card for my beautiful daughter. The finished card is 5 inches by 7 inches.

For the panel, I ink blended squeezed lemonade distress oxide ink around the edges leaving the centre clear. I then blended picked raspberry distress oxide over top of that but not going as far as the yellow. This gave me a beautiful coral colour round the edge with a yellow centre.

When completely dry, I stamped the the flowers and butterflies and heat embossed with Hero Arts white satin pearl embossing powder. The sentiment is gold heat embossed.

I then spattered perfect pearls and water over the whole background for sparkle.


The fairy and flower are from my monthly hero December 18 and are stamped onto distress watercolour paper. The fairy is black heat embossed and the flower is gold heat embossed. They were then coloured using distress inks in the same colours as the background. I then added a little colour pencil for added depth.

The fairy and flower were then die cut and attached with foam tape.
Nuvo glitter pen on the fairy and flower and gelly roll sparkle pen on the wand and dropping down onto the sentiment.
Inside the card, more butterflies are stamped in pale yellow and pink and the sentiment is Paper Rose Studio large happy birthday in gold shimmer paper.
There is glossy accents on the flower centre into which I dropped some clear micro beads from Paper Rose Studio.


Thanks for stopping by,
Helen xo


9 Jun 2021

Cupcake Birthday Cards

 These four cards have been made using Hero Arts Happy Birthday Cupcake stamp and die set. I started by stamping the cupcake multiple times onto bristol smooth cardstock using antique linen distress ink. 

They were then coloured with zig real colour brush markers and cut out. I then decided on the background colours based on the cupcake colours. 
The background colours are distress oxide inks in squeezed lemonade and spun sugar. The coral coloured one is Hero Arts fresh peach ink using second generation stamping.

The backgrounds were cut using MFT in and out diagonal rectangle die and the edges inked with the same ink as the stamping.

I cut circles of white cardstock on which to adhere the cupcakes and also inked the edges of these. 


The sentiment was stamped in Versafine onyx black ink onto cardstock I'd coloured with the inks used so everything was the same .

The circle was adhered to the background and the cupcake was stacked onto another cardstock one and adhered to the circle. The sentiment was also stacked. I used a layer of cardstock because I didn't want the bulk of foam tape.

I then added nuvo drops to the background and the cupcake wrapper, and iridescent glitter glue to the frosting for sparkle. Glossy accents finished the cherries.

The pink one I made slightly differently. I felt it was a bit too pink so added black splatters to tone it down. I tried to do a silver cupcake wrapper by using diluted black with perfect pearls added. 

I wasn't happy with that, so decided to paper piece it with some silver glitter paper. I then stamped another cupcake using spun sugar and cut the frill of the wrapper and adhered that in place. I love how it turned out and I think this one is my favourite.


Thanks for stopping by, 

Helen xo


30 May 2021

Rainbow Balloon Birthday Card

 I started by blending distress oxide inks on a white panel in rainbow order.

Colours used were picked raspberry,  carved pumpkin,  fossilised amber, twisted citron, salty ocean and wilted violet. I then splattered with perfect pearls. For more sparkle, the panel could have been sprayed with perfect pearl solution but I only thought of that while writing this post.

Using the second largest balloon from Paper rose Studio nesting balloons, I cut the balloon from the middle of the rainbow panel.

The panel was adhered directly to the card base and the balloon was adhered using foam tape. 

Using Paper Rose Studio Large Happy Birthday die, I cut 2 heavy weight white and 1 silver and then stacked them to make a thicker die cut. This was then adhered to the balloon.  I drew in a balloon string using a sparkle gelly roll pen.

I finished with some pretty stars that were from an old Hero Arts kit and, using a small balloon stamp from another Hero Arts kit, I stamped a rainbow of balloons inside the card.


Thanks for stopping by,
Helen xo


14 Feb 2021

Sketchy Rose Birthday Card

 I used the final alcohol ink panel from my previous post for this card. I had tried gold foil on all 4 panels and wasn't very successful. It worked the best on this panel so I continued the gold with everything else.

Using Paper Rose Studio Sketchy Rose, I gold heat embossed using Hero Arts gold  on vellum and fussy cut. 

The alcohol ink panel was cut down to be slightly narrower than a card front. A strip of gold mirror cardstock was added to the edge. I adhered the flower using tiny dots of glue on the embossing lines.

 Gold mirror cardstock was cut using Paper Rose Studio Large Happy Birthday die. For added dimension, I stacked the sentiment on teal cardstock.

I also stamped the rose inside the card using teal ink. 


Thanks for stopping by, 

Helen xo


10 Oct 2020

U Fold Christmas Card


I was inspired by the wonderful Kelly Bates for this card. You can find her card Here and  I used her measurements. 

The cardbase is Neenah 110lb, 4.25 by 8 inches. Score lines are 1.25, 2.5, 5.5 and 6.75 inches.

I didn't have suitable Christmas paper so I stamped each end using images from My Monthly Hero Nov18. The snow flakes are golden glitz Delicata ink and the candy canes are red ruby from Hero Arts.

The tree die cut is My Monthly Hero Oct18 and I cut it from Lawn Fawn Knit Picky paper for some texture.

I inked around the edges of the tree with dark green ink and adhered the two pieces together. I then added a garland and baubles using red stickles and Nuvo glitter drops in honey gold and emerald city.

After waiting 24 hours for everything to dry, I adhered the tree to a panel I'd inked the edges with antique linen distress ink and then adhered this to the centre panel on the card.

The gifts under the tree are from a small Lawn Fawn birthday set and are coloured with copic markers with white gel pen details.

The bridge is 2 layers of Neenah 110lb, edges inked in antique linen and stamped as per card.

The Merry Christmas sentiment is Memory Box and cut from gold mirror cardstock. 
The bridge was cut to .75 by 5.5 inches. This was slightly too long due the bulk on the inside of the card. 
So I adhered the left side only, folded the card flat and then adhered the right hand side. I was then able to trim off the tiny amount off excess. 


I finished with more red stickles and gold Nuvo drops on the left and right sides.

Thanks for stopping by,
Helen xo


21 Sept 2020

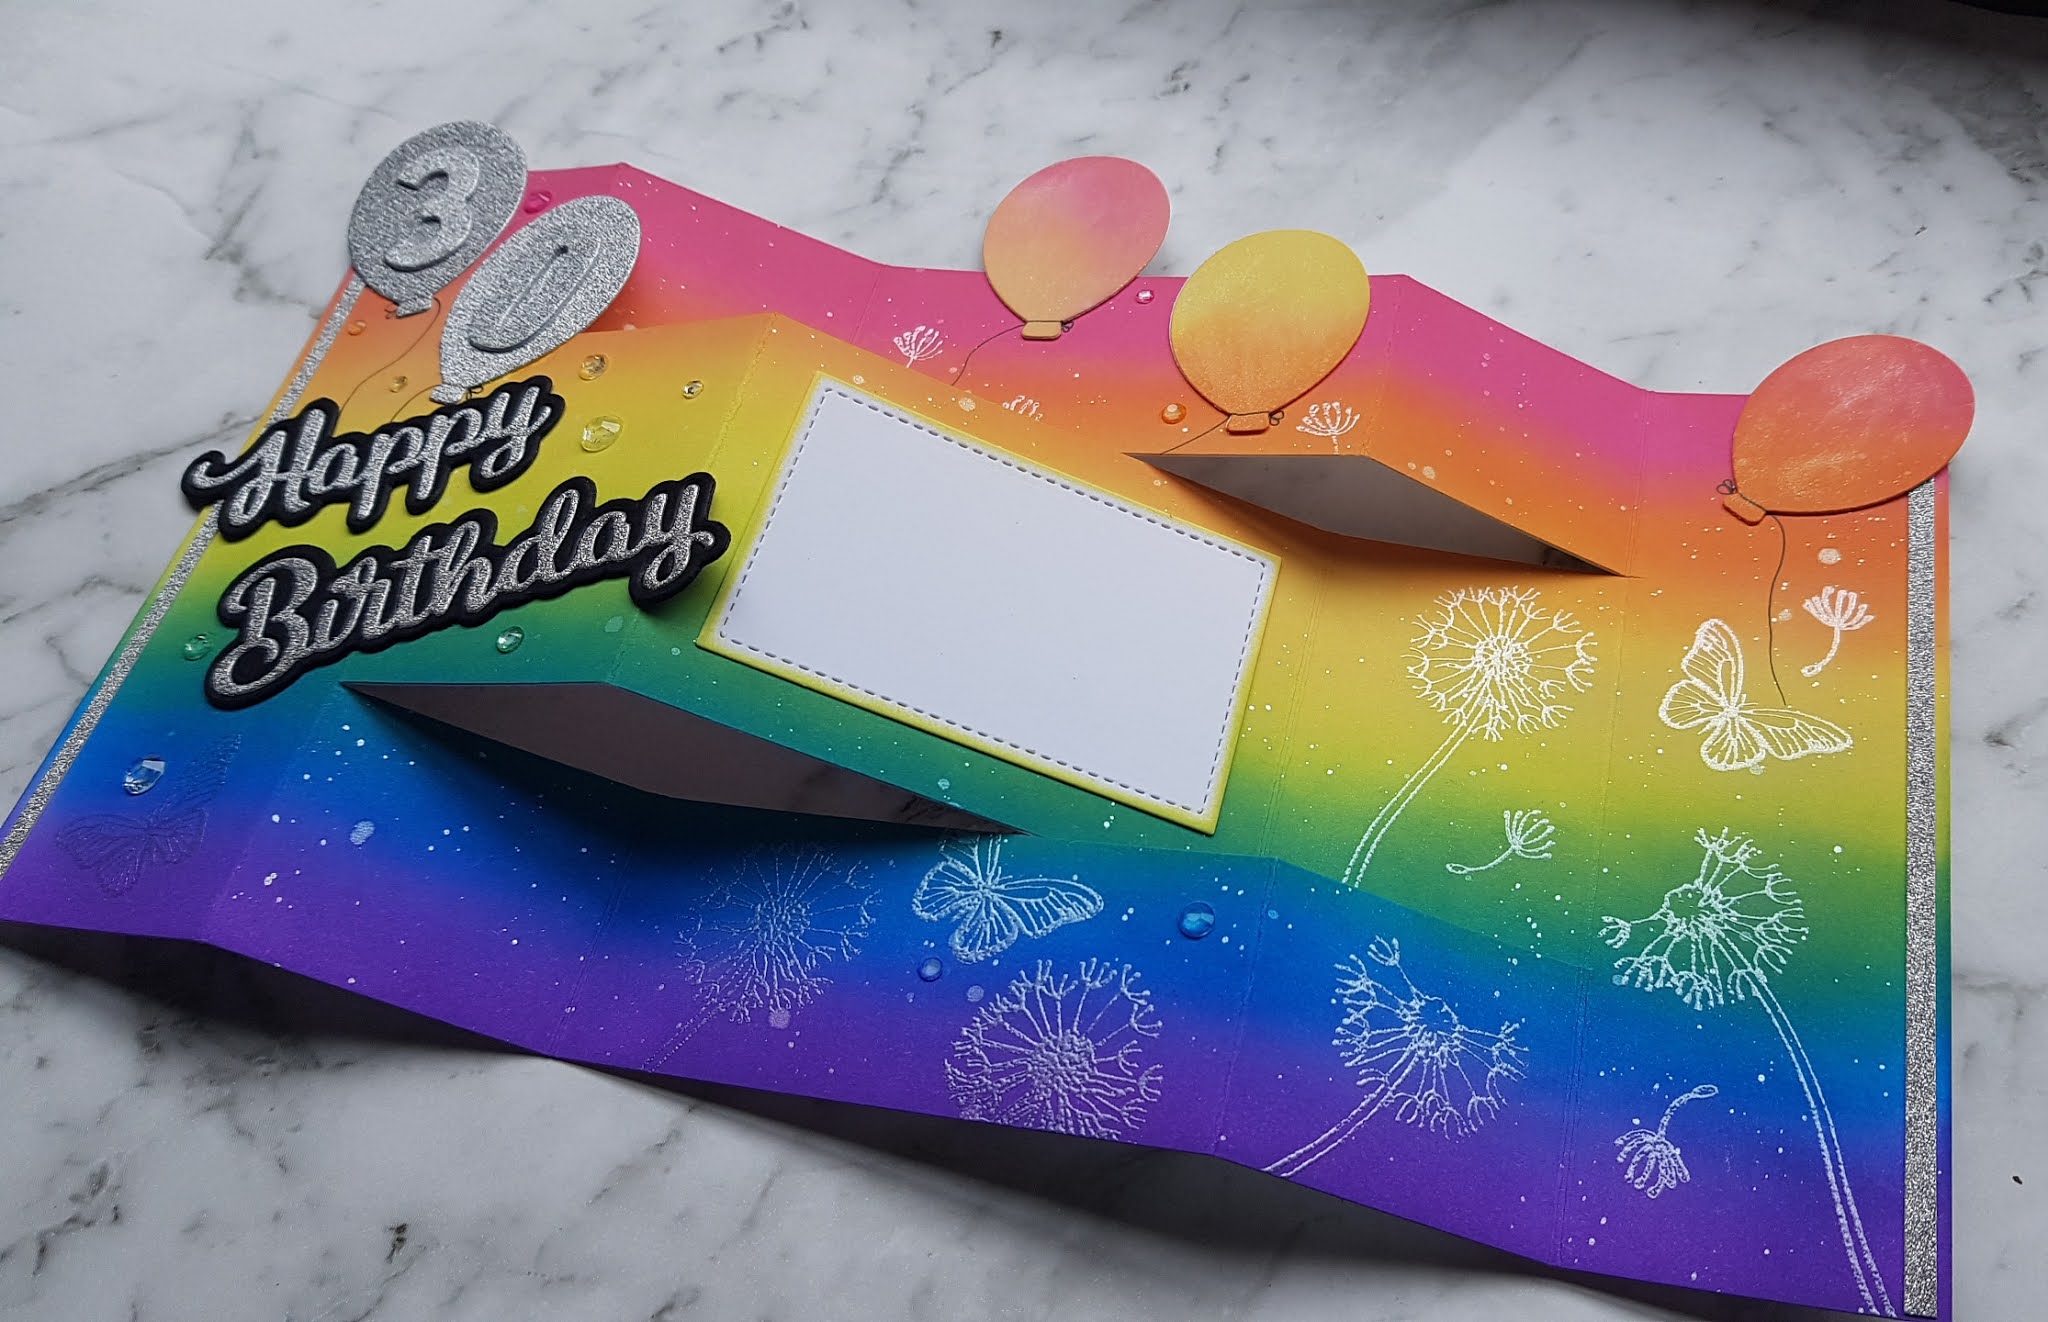
Tri Fold Shutter Birthday Card


A birthday card for my beautiful daughter. 

I started with a piece of Neenah 110lb cardstock and blended distress oxides in picked raspberry, squeezed lemonade, spiced marmalade, twisted citron, salty ocean and wilted violet. 

Then perfect pearls in water splatter. I then waited til the next day to score and cut. I was worried the scoring would remove the ink but it worked beautifully. 


Taylored Expressions Bold Balloons.
Paper Rose Studio Large Happy Birthday and Number dies.
My Monthly Hero December 2018 dandelions in Hero Arts White Satin Pearl embossing powder.
Avery Elle butterflies.
Pretty Pink Posh sparkling clear gems
Nuvo shimmer pen on the 3 coloured balloons.

Thanks for stopping by,
Helen xo


25 Aug 2020

Fairies In The Forest Celebrating A Birthday

 This card is for my granddaughter who's turning two soon. Where does the time go??

I started with 2 panels of shiny cardstock and used alcohol inks in pearl sublime ( main colour), with small amounts of willow, patina and sunshine yellow. The alcohol pearl ink gave a beautiful shimmer. I also added some gold foil.

When they had dried, I trimmed them both to card size and chose the best one and used a die from Hero Arts my monthly hero September 18 to cut out the centre.

I then used an oval die to cut out the middle of the other panel. I adhered to two together, but only around the outside edge so I'd be able to tuck the fairies in . 

I saved the off cuts to cut letters for Veronica's name using Hero Arts Uppercase Alphabet Fancy Dies and a couple of extra leaves I tucked in.

I thought it needed more, so inked around the edges with black soot distress ink ( as seen in the final photos).

I stamped and coloured with copic markers the fairies, house and flowers from Lawn Fawn Fairy Friends stamp set and used coordinating dies.

On another panel, I softly blended distress inks antique linen and mowed lawn. I regret not adding more texture here but we live and learn. This panel was adhered to the front of a Neenah desert storm cardbase. To this, I adhered the fairy house and some flowers.

For the shaker, I added acetate behind the opening in the alcohol ink panel and added foam tape around the oval and then covered the back with more foam tape. I've only used one layer of foam. I removed the release paper from only around the oval and added some seed beads and micro beads. Then added another layer of acetate to contain them.

I then removed the rest of the release paper and adhered this to my cardbase.

I tucked the fairies and some more flowers behind the leaves and added a gold 2.

I gold heat embossed Happy Birthday on an off cut but didn't like it on the front of the card so adhered it inside. The inside images are stamped in Momento rich cocoa and coloured with Prismacolor pencils.


Thanks for stopping by,
Helen xo


18 Aug 2020

Cute Mouse Card


The new challenge for a blog named hero is "cute" and what could be cuter than this sweet little mouse from Hero Arts so I thought I'd enter this card.
I started by stamping the image with momento tuxedo black ink onto Neenah 80lb card because I wanted to use copic markers. I left the stamp in my stamp positioner because I wanted to re stamp it when I finished colouring. I then masked the mouse.
With the mouse safely masked, I used a makeup brush to blend mustard seed distress ink around the edges, leaving a halo around the mouse.
I then did spatters of perfect pearls powder in water to add interest.
The mask was then removed and the mouse coloured with W1, W3, W5, W7 with R20 for the ears and cheeks. I then re stamped the mouse with Versafine onyx black and then the sentiment with the same ink.
I cut the panel with a stitched rectangle die and adhered it to a cardbase that I had stamped with Hero Arts blowing in the wind background stamp. I used squeezed lemonade distress oxide ink and clear heat embossed it.
I added dots of a Gelly Roll sparkle pen around the dandelion and trailing up and some clear droplets around the sentiment.
Thanks for stopping by,
Helen xo


1 Aug 2020

Emboss Resist Roses


This card is similar to the previous post but still different using Paper Rose Studio sketchy Rose.
 Initially, I didn't like it but I left it for a day and then went back to it.
The flowers are white heat embossed onto neenah 80lb. Using my stamp positioner, I stamped the first flower in a corner so most of it was on the page. I then rotated the paper  and stamped the opposite corner. Added white embossing powder and heat set.
 I then stamped the other two corners in the same manner but positioned the rose further off the page. These two flowers slightly overlapped the first two. I did not bother masking the first two. I simply stamped in Versamark, added embossing powder and then brushed away the overlapping bits with a dry paintbrush. I then heat set normally.
The ink where the powder was brushed away is very slightly visible under the ink blending but you only notice it if you know its there.
Using a makeup brush, I ink blended pool ink over the embossing, coming in from each corner and leaving the centre of the panel very pale. I added more blending to the flower centres until I was happy with it. Using a small makeup brush, I blended lemon ink over the leaves. I then used the pool ink over the flowers and the leaves so the leaves turned green. This is not so obvious in the photos but the leaves are definitely green.
I then mixed some pool ink with a little water and spattered the whole background.
The panel was cut to be slightly smaller than my card base and adhered.
The hello sentiment is from Hero Arts and it was cut from white cardstock and coloured with fiesta teal ink, also from Hero Arts. I adhered it diagonally to mask the fact that I had a weird shape in the middle. I finished with some Nuvo jewel drops in sea breeze.
Thanks for stopping by,
Helen xo

23 Jul 2020

Monster Interactive Birthday Card


A birthday card for my grandson later in the year using Brutus Monroe Monster Selfie set.
I started with a piece of Neenah 80lb cut to size and sponged on distress inks in rainbow colours around the edges. I wasn't worried about going over the middle because that section was cut out.
I spattered with water and perfect pearls solution and set aside to dry.
The monsters were stamped onto bristol smooth paper in versafine onyx black and clear heat embossed. I coloured them using Zig real brush markers, again in rainbow colours and then fussy cut them.
 Using a circle die, I selectively cut the panel so the bottom edge didn't cut. I trimmed the bottom edge of the circle with a craft knife.
I turned the panel over and adhered a piece of acetate over the opening. I then put a double layer of foam tape around the edge of the panel and around the semi circle. I then removed the release paper from the foam tape around the semi circle and put brightly coloured sequins and beads in the opening for colour and sound. I then put another sheet of acetate over this to seal the sequins and beads in.
I then removed the rest of the release paper and adhered this panel to my card base.
For Thomas's name ,I used Hero Arts Uppercase Alphabet Fancy dies. These dies are the perfect size to personalise cards.
I added a few white highlights to the monsters using a white gel pen and adhered a strip of black cardstock to the bottom of them. I put an action wobbler to the back of the monsters and then adhered them to the card.
COLOUR, SOUND AND MOVEMENT!

Thanks for stopping by, 
Helen xo

Featured Post

Pink Thank you Card