Showing posts with label distress ink. Show all posts

29 Sept 2021

Balloon Background Birthday Card

 Using Paper Rose Studio Balloons 3D embossing folder, I embossed a panel of watercolour paper. Then, using mini distress ink cubes in rainbow order I swiped across the embossed panel. I then sprayed the panel with water so the inks would move. Colours used were picked raspberry, mustard seed, twisted citron, salty ocean and wilted violet.


I trimmed the panel when it had dried and matted it on pink cardstock. This was then adhered to a white card base leaving a thin white border.

Sentiment is Paper Rose Studio large happy birthday die.

I finished with some star sequins, also in rainbow colours. 

Thanks for stopping by,
Helen xo


21 Sept 2021

Fairy Birthday Wishes


I made this birthday card for my beautiful daughter. The finished card is 5 inches by 7 inches.

For the panel, I ink blended squeezed lemonade distress oxide ink around the edges leaving the centre clear. I then blended picked raspberry distress oxide over top of that but not going as far as the yellow. This gave me a beautiful coral colour round the edge with a yellow centre.

When completely dry, I stamped the the flowers and butterflies and heat embossed with Hero Arts white satin pearl embossing powder. The sentiment is gold heat embossed.

I then spattered perfect pearls and water over the whole background for sparkle.


The fairy and flower are from my monthly hero December 18 and are stamped onto distress watercolour paper. The fairy is black heat embossed and the flower is gold heat embossed. They were then coloured using distress inks in the same colours as the background. I then added a little colour pencil for added depth.

The fairy and flower were then die cut and attached with foam tape.
Nuvo glitter pen on the fairy and flower and gelly roll sparkle pen on the wand and dropping down onto the sentiment.
Inside the card, more butterflies are stamped in pale yellow and pink and the sentiment is Paper Rose Studio large happy birthday in gold shimmer paper.
There is glossy accents on the flower centre into which I dropped some clear micro beads from Paper Rose Studio.


Thanks for stopping by,
Helen xo


9 Jun 2021

Cupcake Birthday Cards

 These four cards have been made using Hero Arts Happy Birthday Cupcake stamp and die set. I started by stamping the cupcake multiple times onto bristol smooth cardstock using antique linen distress ink. 

They were then coloured with zig real colour brush markers and cut out. I then decided on the background colours based on the cupcake colours. 
The background colours are distress oxide inks in squeezed lemonade and spun sugar. The coral coloured one is Hero Arts fresh peach ink using second generation stamping.

The backgrounds were cut using MFT in and out diagonal rectangle die and the edges inked with the same ink as the stamping.

I cut circles of white cardstock on which to adhere the cupcakes and also inked the edges of these. 


The sentiment was stamped in Versafine onyx black ink onto cardstock I'd coloured with the inks used so everything was the same .

The circle was adhered to the background and the cupcake was stacked onto another cardstock one and adhered to the circle. The sentiment was also stacked. I used a layer of cardstock because I didn't want the bulk of foam tape.

I then added nuvo drops to the background and the cupcake wrapper, and iridescent glitter glue to the frosting for sparkle. Glossy accents finished the cherries.

The pink one I made slightly differently. I felt it was a bit too pink so added black splatters to tone it down. I tried to do a silver cupcake wrapper by using diluted black with perfect pearls added. 

I wasn't happy with that, so decided to paper piece it with some silver glitter paper. I then stamped another cupcake using spun sugar and cut the frill of the wrapper and adhered that in place. I love how it turned out and I think this one is my favourite.


Thanks for stopping by, 

Helen xo


5 Jun 2021

Rainbow Butterflies Card


This card was inspired by the incredibly talented Amy Rysavy. 

I started with a quarter sheet of canson XL watercolour paper. 

The butterflies are from Avery Elle Butterfies stamp set and were stamped and gold heat embossed with Hero Arts gold embossing powder.

The panel was then taped to a board and I used a wash of distress inks over top in rainbow order. When this was dry, I added a second layer. In hindsight, I think I'd prefer only one layer because I feel it's a bit dark.

Colours used are picked raspberry, carved pumpkin, fossilised amber, mowed lawn, salty ocean and wilted violet.

Using the same colours as the background wash, I painted the butterflies with a mix of distress ink, water and perfect pearls. So much shimmer on the butterflies!

When the panel was dry, I splattered perfect pearls and black soot distress ink.

The sentiment is Paper Rose Studio large Happy Birthday die. I struggled with what colour to use and settled with black offset on gold because I didn't like plain black or plain gold. 

I gave the panel a thin black mat and adhered to a card base and finished with morning dew nuvo drops.


Thanks for stopping by,
Helen xo


30 May 2021

Rainbow Balloon Birthday Card

 I started by blending distress oxide inks on a white panel in rainbow order.

Colours used were picked raspberry,  carved pumpkin,  fossilised amber, twisted citron, salty ocean and wilted violet. I then splattered with perfect pearls. For more sparkle, the panel could have been sprayed with perfect pearl solution but I only thought of that while writing this post.

Using the second largest balloon from Paper rose Studio nesting balloons, I cut the balloon from the middle of the rainbow panel.

The panel was adhered directly to the card base and the balloon was adhered using foam tape. 

Using Paper Rose Studio Large Happy Birthday die, I cut 2 heavy weight white and 1 silver and then stacked them to make a thicker die cut. This was then adhered to the balloon.  I drew in a balloon string using a sparkle gelly roll pen.

I finished with some pretty stars that were from an old Hero Arts kit and, using a small balloon stamp from another Hero Arts kit, I stamped a rainbow of balloons inside the card.


Thanks for stopping by,
Helen xo


21 Sept 2020

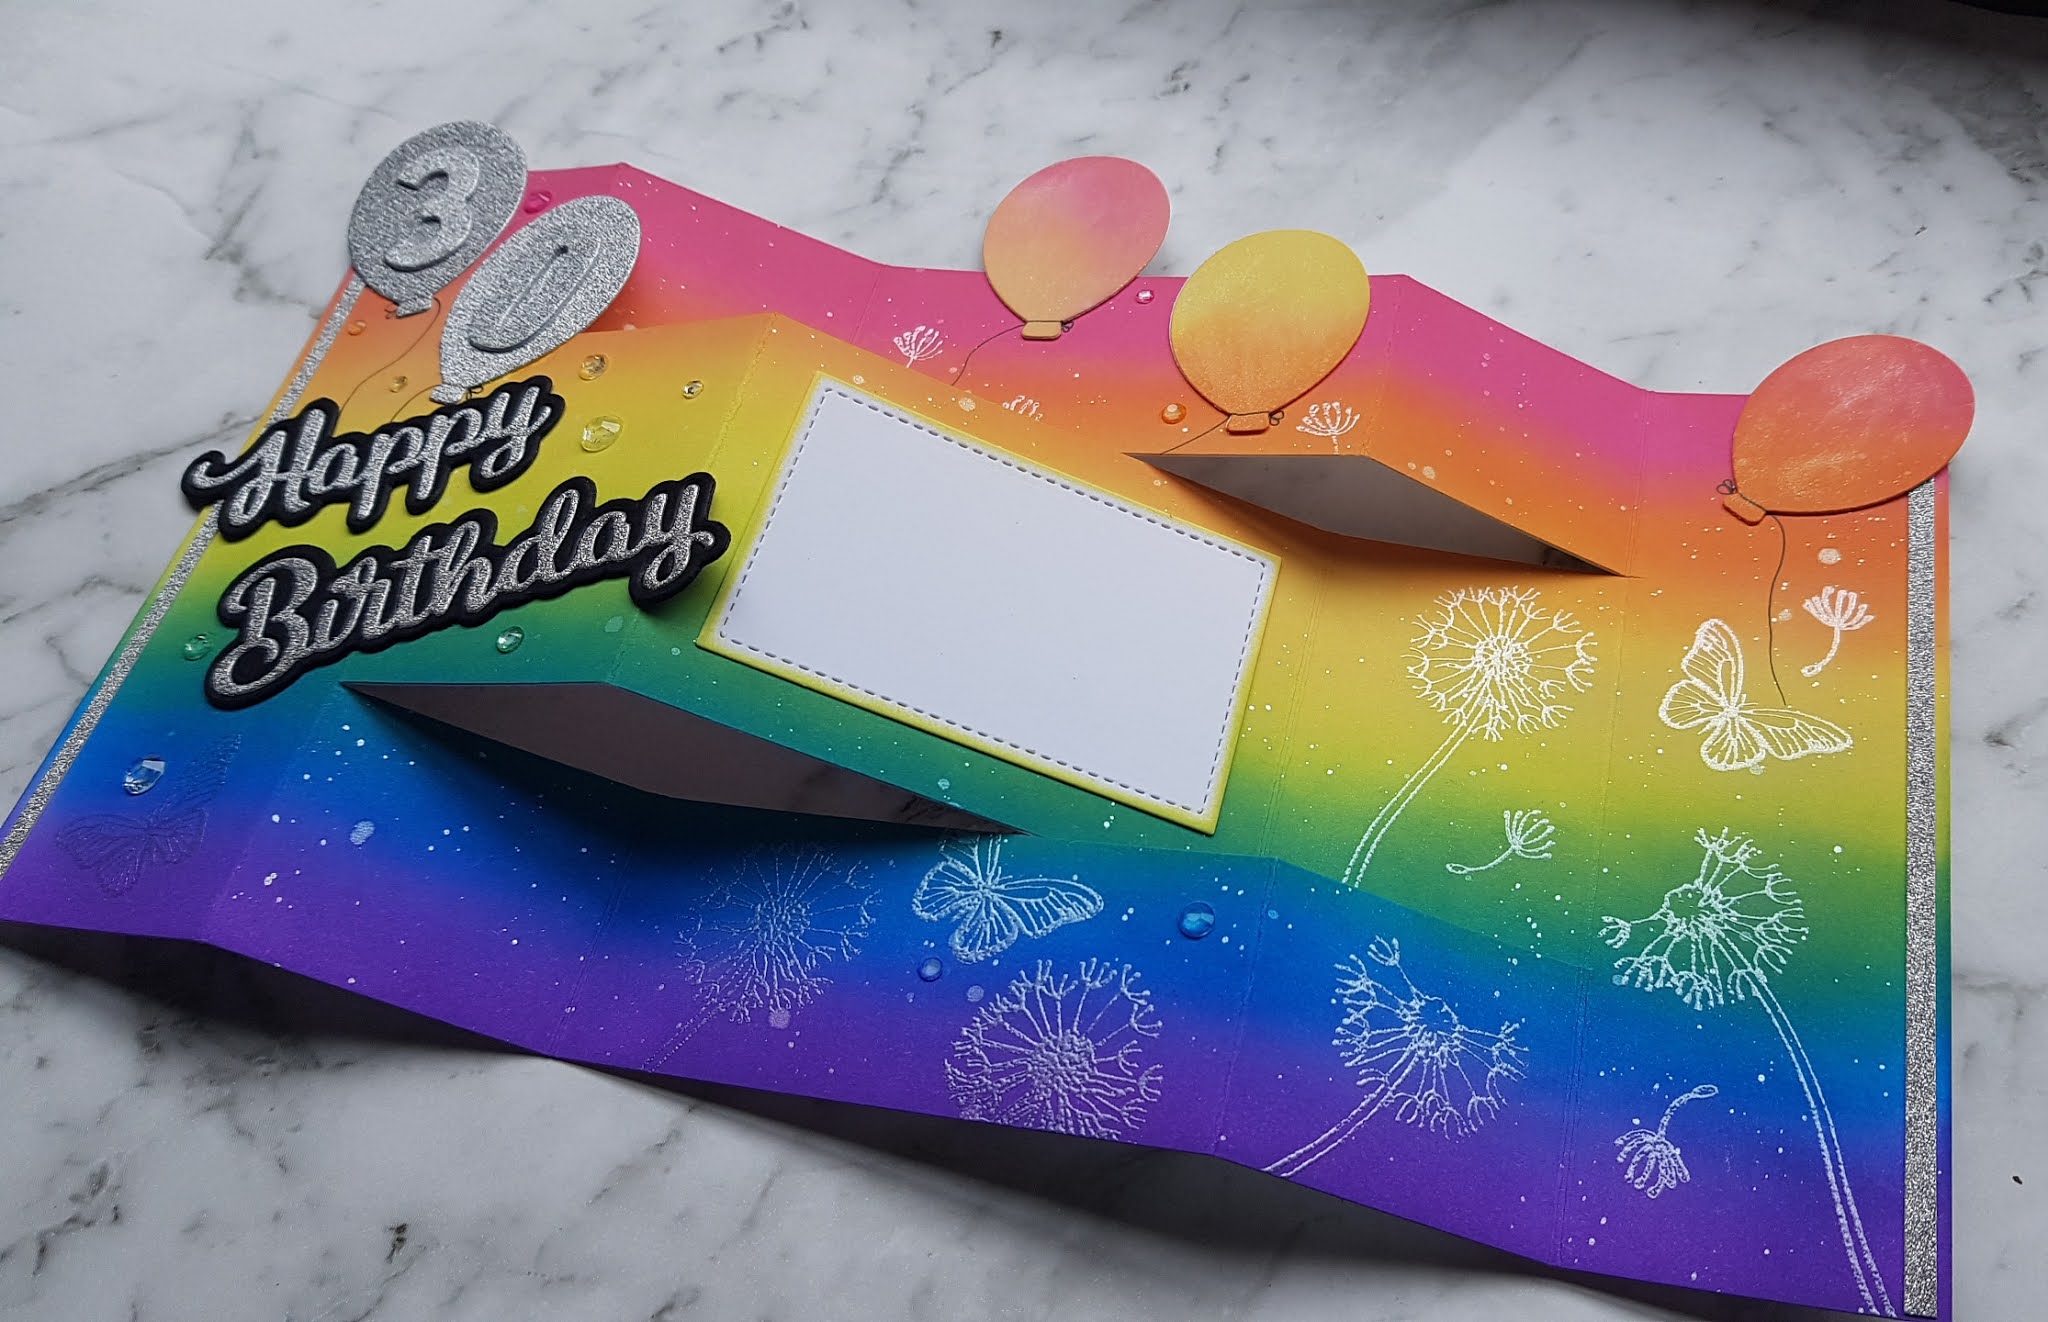
Tri Fold Shutter Birthday Card


A birthday card for my beautiful daughter. 

I started with a piece of Neenah 110lb cardstock and blended distress oxides in picked raspberry, squeezed lemonade, spiced marmalade, twisted citron, salty ocean and wilted violet. 

Then perfect pearls in water splatter. I then waited til the next day to score and cut. I was worried the scoring would remove the ink but it worked beautifully. 


Taylored Expressions Bold Balloons.
Paper Rose Studio Large Happy Birthday and Number dies.
My Monthly Hero December 2018 dandelions in Hero Arts White Satin Pearl embossing powder.
Avery Elle butterflies.
Pretty Pink Posh sparkling clear gems
Nuvo shimmer pen on the 3 coloured balloons.

Thanks for stopping by,
Helen xo


18 Aug 2020

Cute Mouse Card


The new challenge for a blog named hero is "cute" and what could be cuter than this sweet little mouse from Hero Arts so I thought I'd enter this card.
I started by stamping the image with momento tuxedo black ink onto Neenah 80lb card because I wanted to use copic markers. I left the stamp in my stamp positioner because I wanted to re stamp it when I finished colouring. I then masked the mouse.
With the mouse safely masked, I used a makeup brush to blend mustard seed distress ink around the edges, leaving a halo around the mouse.
I then did spatters of perfect pearls powder in water to add interest.
The mask was then removed and the mouse coloured with W1, W3, W5, W7 with R20 for the ears and cheeks. I then re stamped the mouse with Versafine onyx black and then the sentiment with the same ink.
I cut the panel with a stitched rectangle die and adhered it to a cardbase that I had stamped with Hero Arts blowing in the wind background stamp. I used squeezed lemonade distress oxide ink and clear heat embossed it.
I added dots of a Gelly Roll sparkle pen around the dandelion and trailing up and some clear droplets around the sentiment.
Thanks for stopping by,
Helen xo


27 Jul 2020

Sketchy Roses Thank You Card


I've used the Paper Rose Studio Sketchy Roses card kit for this thank you card.
I stamped the flowers and buds onto Canson XL watercolour paper and gold heat embossed them. The flower and buds were coloured using distress inks. Colours were mustard seed first and then fossilized amber at the base of the petals and where shadows would be. I then put abandoned coral over the fossilized  amber.
The leaves are mowed lawn wash, drop in pine needles while wet, allow to dry and then go over with mowed lawn again.
I thought the images needed more dimension, so added some shading with Prismacolor pencils. I used orange on the petals because I don't have a coral pencil but it still worked. I used dark green and grass green for the petals. Images were then fussy cut.
The panel is is more Canson watercolour paper and I ink smooshed with mustard seed and fossilized amber distress inks. When this was completely dry, I spattered it with a mixture of mowed lawn and pine needles. This gave a slight green speckle in the background.

I cut the panel using MFT In and Out diagonal rectangle die and sponged around the outside with fossilized amber.
I arranged the flowers on the panel and determined where to put the sentiment. I used the SimonSaysStamp thanks die and cut it directly from the panel.
I adhered the panel to my cardbase, put the diecut onto foam and then adhered it back into place. I had planned to sponge fossilized amber around the die cut before I adhered it, but I forgot, so I used glossy accents over it instead.
I attached the buds and extra leaves to the flower and then put it all on foam tape and adhered to the card. I thought it needed one more leaf so I coloured another one and adhered it directly to the card.
I added sparkle to the flowers and thought that was enough.


Thanks for stopping by,
Helen xo

23 Jul 2020

Monster Interactive Birthday Card


A birthday card for my grandson later in the year using Brutus Monroe Monster Selfie set.
I started with a piece of Neenah 80lb cut to size and sponged on distress inks in rainbow colours around the edges. I wasn't worried about going over the middle because that section was cut out.
I spattered with water and perfect pearls solution and set aside to dry.
The monsters were stamped onto bristol smooth paper in versafine onyx black and clear heat embossed. I coloured them using Zig real brush markers, again in rainbow colours and then fussy cut them.
 Using a circle die, I selectively cut the panel so the bottom edge didn't cut. I trimmed the bottom edge of the circle with a craft knife.
I turned the panel over and adhered a piece of acetate over the opening. I then put a double layer of foam tape around the edge of the panel and around the semi circle. I then removed the release paper from the foam tape around the semi circle and put brightly coloured sequins and beads in the opening for colour and sound. I then put another sheet of acetate over this to seal the sequins and beads in.
I then removed the rest of the release paper and adhered this panel to my card base.
For Thomas's name ,I used Hero Arts Uppercase Alphabet Fancy dies. These dies are the perfect size to personalise cards.
I added a few white highlights to the monsters using a white gel pen and adhered a strip of black cardstock to the bottom of them. I put an action wobbler to the back of the monsters and then adhered them to the card.
COLOUR, SOUND AND MOVEMENT!

Thanks for stopping by, 
Helen xo

22 Jul 2020

MFT Fresh Cut Flowers


Using MFT fresh-cut flowers bouquet, I stamped onto Tim Holtz watercolour paper with versamark ink and heat embossed with gold embossing powder.
I then did a very pale wash of colour using mustard seed and abandoned coral distress inks around the stamp. I wasn't  careful with the yellow because I wanted the flowers yellow and it wouldn't have affected the leaves too much. I was much more careful with the coral and kept it away from the leaves. It's very subtle but still obvious.
When that was dry, I used the yellow ink to watercolour the flowers. I then added depth with the coral. The leaves are twisted citron and mowed lawn distress inks.
I then protected the flowers and spattered the yellow and coral ink over the panel.
When it was completely dry, I die cut the panel using MFT in and out diagonal stitched rectangle.
I gold heat embossed the sentiment on a vellum strip and wrapped it around the panel and secured on the back. This was then adhered to a light yellow cardbase.
I used gold glitter nuvo drops for the flower centre. I put a few drops down first, leaving gaps so they didn't run into each other. Then they were dry, I added more into the gaps I'd left. I then added shimmer to the flowers.

Thanks for stopping by, 
Helen xo

20 Jul 2020

Rainbows and Lockdown


Who can't help but smile when they see rainbows and adorable elephants?
 I made this card for my daughter and grandchildren to cheer them up while we're in lockdown.
I used My Favourite Things adorable elephants stamp set. The elephants, balloon and butterfly were stamped in momento tuxedo black ink and coloured with copic markers, elephants using warm greys.

The background is distress oxides picked raspberry, spiced marmalade, fossilised amber, twisted citron, salty ocean and wilted violet. Then spattered with water and perfect pearls solution. I then trimmed this so it would leave a white border. 
The sentiments were stamped in versafine onyx black and the elephants are on foam tape.
On the inside, I adhered the strip I trimmed from the front panel and another elephant. I then stamped the butterfly using the same distreess oxide inks I used on the front panel.

Thanks for stopping by,
Helen xo

19 Jul 2020

Superhero Birthday Card


This birthday card was made using the superhero card kit from Paper Rose Studio. The buildings were part of a piece of patterned paper from the kit but I wanted a sunset behind the buildings. I tried changing it but it didn't work so I created my own sunset on a separate piece of Neenah 80lb using the distress inks picked raspberry, wilted violet, seedless preserves and black soot.
The rays were added using Hero Arts white pigment ink. I then spattered the background with white paint and perfect pearls mixed with water
 I then fussy cut the buildings and adhered to the bottom of this panel.
The superhero was stamped in versafine onyx black ink and coloured with Zig real colour brush markers.
I fussy cut him and adhered with foam tape. I added sparkle to his cape and glossy accents to his badge.
The sentiment is white heat embossed on black cardstock

Thanks for stopping by ,
Helen xo

Featured Post

Pink Thank you Card